初めまして。2019年6月にAstamuseにjoinした rinoguchi です。
ついに昨日、日本でも緊急事態宣言が出ましたね。小学校の休校も1ヶ月程度延長されましたし、会社もリモートワークにほぼ移行してますし、ここできっちりウイルスの拡散を防ぎたいところです。屋根瓦. なんとなく並列処理を連想しませんか?
はじめに
それはそうと、私は当社で、特許データなどの名寄せ(同一人物に対してユニークなIDをふる作業)を担当しております。
特許の名寄せには、人物名・組織名・出願日・共同出願人など様々な特徴を利用するのですが、中国人名などでは同姓同名が起こりやすく、同じ名前で数万件の特許が出願されるケースもあるため、別人を判別する処理(名分け)が重要です。その根拠の一つとして特許の類似性を導入することにしたのですが、特許文書をベクトル化に尋常じゃなく時間がかかるため、処理を並列化することにしました。
分散処理用のクラスタを準備・管理していくのがハードルが高いので、フルマネージドな分散コンピューティングサービスであるDataproc を利用することにしたのですが、Dataprocであっても普通にコンソールやCLIから利用すると、手作業やbashスクリプトが登場してしまいます。
巨大な名寄せアプリケーションは全てPythonで実装され、一連の処理は自動化されていて、特許文書のベクトル化というごく一部の処理のために世界観を崩したくありません。なので、PythonからDataprocを操作してクラスタを構築しPythonのアプリケーションを送り込んでジョブを実行する形にすることで、他のプログラムと同様に全てをPythonコードでコントロールするように工夫しました。
この記事ではトラブル対応も含めPythonからDataprocを操作してシームレスに並列処理を行う方法を紹介していきたいと思います。
アーキテクチャ構成および処理の流れ
以下の図のように、Batch Server上のmain.pyを起点に、①から順番に処理が実行されていきます。
Dataproc周りの環境準備
Dataprocを有効化
こちら に従ってDataprocを有効化します。書いてある通りに進めれば大丈夫です。
GCP Console のプロジェクト セレクタのページで、GCP プロジェクトを選択または作成する
Google Cloud Platform プロジェクトに対して課金が有効になっていることを確認する
クレジットカードを登録する必要があるため個人でやるときは少しハードルがあるかも
一定時間アイドル状態のクラスタを自動削除する設定で払い過ぎリスクを削減します(後述)
Cloud DataprocAPI を有効にする
権限設定
PythonからDataprocを操作する際に利用するサービスアカウントを作成し、権限を与えます。与えるロールは二つです。
Dataproc 編集者(roles/dataproc.editor)
Dataprocを操作するための権限です。詳細はこちら を参照
ストレージ管理者(roles/storage.admin)
DataprocではGCS上のソースコードを読み込んだり、GCS上にログを出力したりします。そのため、ストレージに対する権限がないとdoes not have storage.buckets.getというエラーが発生します。本来もう少し弱いロールを与えたいのですが、こちら を見る限りstorage.buckets.get権限はストレージ管理者ロールにしかないようです。
サービスアカウントを作成したら、キーを作成し保管しておきます。
GCSバケットを作成
実行対象のpythonソースコードや実行対象データ、結果データを保存するために利用します。
Dataprocクラスタを作成するリージョンと同じロケーションを指定し、ストレージ クラスにStandardを指定しておけば問題ないと思います。
実行状況やログの確認
クラスタやジョブの状況は、コンソール画面上で確認しますので、個人アカウントに以下のロールを割り当てる必要があります。
DataProc 閲覧者
ストレージ オブジェクト閲覧者
モニタリング 閲覧者
クラスタやジョブの状況はこちら から確認できます。
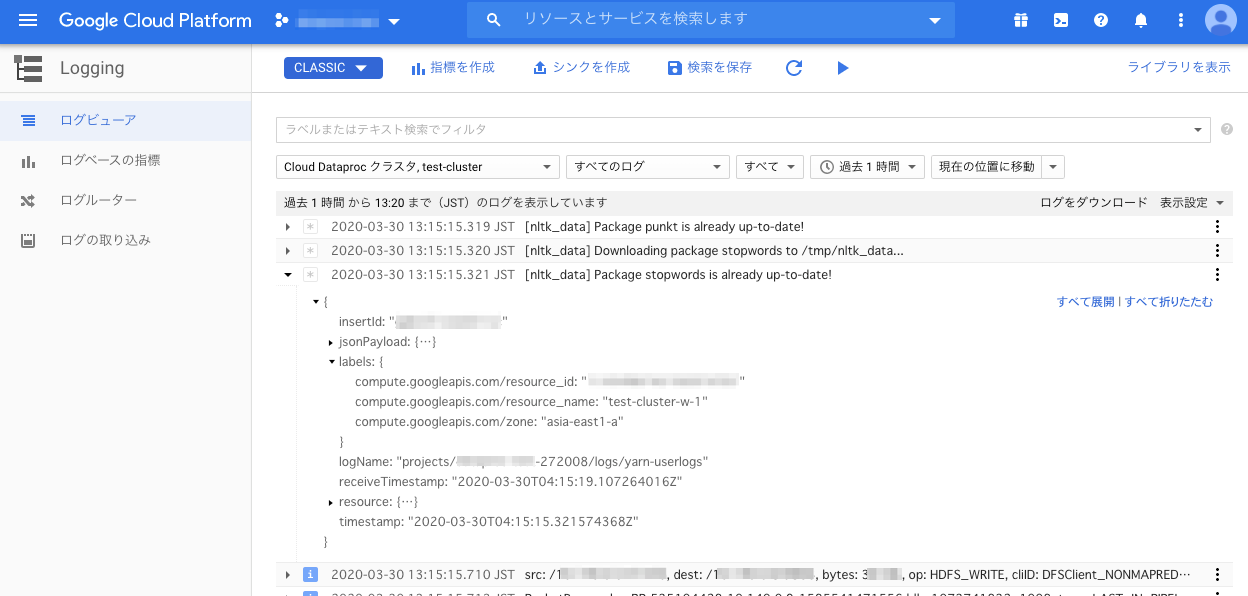
workerノード側のログを確認したい場合は、ログビューア を利用します。labels.compute.googleapis.com/resource_nameに出力されているので、ノード別にフィルタリングすることも可能です。
Python実装
フォルダ構成
以下のようなフォルダ構成にしてあります。
├── main.py
├── master.py
├── worker.py
└── module
├── dataproc.py
└── storage.py
それぞれ、以下のようなことをやっています。
main.py は、処理の起点となるプログラムです。PySparkで実行させたいPythonプログラムや処理対象データをGCSにアップロードして、Dataprocクラスタを作成し、ジョブをsubmitします。master.pyは、ドライバプログラムです。GCSから処理対象データを抽出し、SparkContextを生成、RDDを生成し、並列タスクを実行します。worker.pyは、並列タスクの実体です。文書のベクトル化を行います。moduleフォルダには、共通モジュールを配置してあります。
パッケージインストール
必要なパッケージをインストールしておきます。
pip install google-cloud-dataproc
pip install google-cloud-storage
ソースコード説明
公式サイト やgithub にサンプルソースが書いてあるものの、正直分かりにくかったので、実際に動いているソースコードを全部晒して、詳細に説明していきたいと思います。
main.py
名前からも想像がつくように、処理の起点となるプログラムです。クラスタの外側で、クラスタ内で分散処理を実行するための準備を行い、処理を開始しています。具体的には、以下のような流れです。
実行対象のPythonファイル(master.py、worker.py、storage.py)をGCSにアップロードする
処理対象のデータをGCSにアップロードする
with文でDataprocのクラスタを作成し、ジョブをsubmitして、処理が完了したらクラスタを自動で削除する
with文で扱えるようにする具体的な実装は後述のdataproc.pyを参照のこと
クラスタ作成時に、pip installするパッケージを指定したり、masterノードに定義される環境変数を指定したりしている
サービスアカウントのjsonキーのファイルパスなどは、環境変数で渡します。
from typing import List
import os
from os import environ as env
from google.protobuf.duration_pb2 import Duration
from module.dataproc import DataprocCluster
from module.storage import StorageClient
SENTENCES: List[str ] = [
"Good words cool more than c" ,
"Great talkers are like leaky pitchers, everything runs out of them." ,
"Every path has a puddle." ,
"Fools grow without watering." ,
"We never know the worth of water till the well is dry." ,
"Don't go near the water until you learn how to swim." ,
"Fire and water may be good servants, but bad masters." ,
"Let the past drift away with the water." ,
"Fish must swim thrice; once in the water, a second time in the sauce, and a third time in wine in the stomach." ,
"A sieve will hold water better than a woman's mouth a secret." ,
"If the lad go to the well against his will, either the can will break or the water will spill." ,
"Don't throw out your dirty water until you get in fresh." ,
"A straight stick is crooked in the water." ,
"You never miss the water till the well runs dry." ,
"Drinking water neither makes a man sick, nor in debt, nor his wife a widow." ,
"Mills will not grind if you give them not water." ,
"The pitcher goes so often to the well that it is broken at last." ,
"The mill cannot grind with the water that is past." ,
"The mill gets by going." ,
"A monk out of his cloister is like a fish out of water." ,
"Standing pools gather filth." ,
]
def main ():
storage_client: StorageClient = StorageClient(env['BUCKET_NAME' ], env['PROJECT_ID' ], env['STORAGE_CREDENTIAL_PATH' ])
main_python_file_uri: str = storage_client.upload_to_gcs('./master.py' , 'dataproc/src' )
python_file_uris: List[str ] = [
storage_client.upload_to_gcs('./worker.py' , 'dataproc/src' ),
storage_client.upload_to_gcs('./module/storage.py' , 'dataproc/src/module' ),
]
data_file_path: str = './data.txt'
with open (data_file_path, 'w' ) as f:
for sentence in SENTENCES:
f.write(sentence + ' \n ' )
storage_client.upload_to_gcs(data_file_path, 'dataproc/input' )
os.remove(data_file_path)
with DataprocCluster(
env['PROJECT_ID' ], env['DATAPROC_CREDENTIAL_PATH' ],
idle_delete_ttl=Duration(seconds=1000 ),
pip_packages='more-itertools==5.0.0 nltk==3.4.5 gensim==3.8.1 google-cloud-storage==1.20.0' ,
environment_variables={'PROJECT_ID' : env['PROJECT_ID' ], 'BUCKET_NAME' : env['BUCKET_NAME' ]}
) as cluster:
cluster.submit_pyspark_job(main_python_file_uri, python_file_uris)
print ('do something' )
if __name__ == "__main__" :
main()
master.py
Dataprocクラスタのmasterノードで実行されるいわゆるドライバープログラムです。処理の流れは以下の通りです。
GCSから処理対象のデータを取得する
文書データを5件毎にグルーピングする
実際には約2億件のデータをTF-IDFやLSIで処理するが、これらの処理は件数の増加に対して非線形に処理時間が増加するため、処理時間を抑えるために一回の処理件数を数万件程度に分割している
名分けにおいては、同一の可能性がある候補群の中でベクトル化すれば良いので、イニシャルが同じ(実際にはもう少し複雑だが)候補でグルーピングするようにしている
SparkContextを生成する
グルーピングした文書をRDDに変換して、並列タスクを行う
実際には文書そのものはブロードキャスト変数でノード間で共有し、文書インデックスをRDDに変換して処理している
このmap関数がworkerノード上のExecuterで実行される並列タスクとなる
from os import environ as env
from pyspark import SparkContext, RDD, Broadcast
from typing import List, Tuple
from decimal import Decimal
from itertools import chain
from more_itertools import chunked
from google.cloud.storage.blob import Blob
import worker
try :
from module.storage import StorageClient
except ModuleNotFoundError:
from storage import StorageClient
def main ():
storage_client: StorageClient = StorageClient(env['BUCKET_NAME' ])
sentence_blob: Blob = storage_client.download_from_gcs('dataproc/input/data.txt' )[0 ]
sentences: List[str ] = sentence_blob.download_as_string().decode().split(' \n ' )
chuncked_sentences: List[List[str ]] = list (chunked(sentences, 5 ))
chuncked_sentences_indexes: List[int ] = range (len (chuncked_sentences))
sc: SparkContext = SparkContext()
broadcasted_chuncked_sentences: Broadcast = sc.broadcast(chuncked_sentences)
rdd: RDD = sc.parallelize(chuncked_sentences_indexes)
vectors: List[List[Tuple[int , Decimal]]] = list (chain.from_iterable(
rdd.map(lambda index: worker.vectorize(broadcasted_chuncked_sentences.value[index])).collect()
))
print (vectors)
if __name__ == "__main__" :
main()
worker.py
vectorize()がworkerノードのExecuterで実行されるアプリケーションコードの実体です。
from typing import List, Tuple
import string
from decimal import Decimal
from gensim import models
from gensim.corpora import Dictionary
from gensim.interfaces import TransformedCorpus
from gensim.models import LsiModel
import nltk
from nltk import tokenize
from nltk.stem.porter import PorterStemmer
from nltk.corpus import stopwords
nltk_data_dir: str = '/tmp/nltk_data'
nltk.download('punkt' , download_dir=nltk_data_dir)
nltk.download('stopwords' , download_dir=nltk_data_dir)
nltk.data.path.append(nltk_data_dir)
def vectorize (sentences: List[str ]) -> List[List[Tuple[int , Decimal]]]:
words_list: List[List[str ]]
words_list = list (tokenize.word_tokenize(sentence) for sentence in sentences)
words_list = list (list (word.strip(f'{"".join(string.punctuation)}' ) for word in words) for words in words_list)
ps: PorterStemmer = PorterStemmer()
words_list = list (list (ps.stem(word) for word in words) for words in words_list)
stop_words: List[str ] = stopwords.words('english' )
exclude_words: List[str ] = stop_words + list (string.ascii_lowercase) + list (string.digits) + list (string.punctuation) + ['``' ]
words_list = list (list (word for word in words if word not in exclude_words) for words in words_list)
dictionary: Dictionary = Dictionary(words_list)
corpus: List[List[Tuple[int , int ]]] = list (map (dictionary.doc2bow, words_list))
tfidf_model: models.TfidfModel = models.TfidfModel(corpus)
tfidf_corpus: TransformedCorpus = tfidf_model[corpus]
lsi_model: LsiModel = LsiModel(corpus=tfidf_corpus, id2word=dictionary, num_topics=300 )
lsi_corpus: TransformedCorpus = lsi_model[tfidf_corpus]
sentence_vectors: List[List[Tuple[int , Decimal]]] = list (
c for c in lsi_corpus
)
return sentence_vectors
dataproc.py
Dataprocを操作するためのモジュールです。ここは説明したいポイントがたくさんあります。
__init__ では、クラスタの作成をしています
クラスタ設定は、cluster_dataで指示しています
設定内容は、こちら を参考に、プロパティ名を lower snake case に読み替えればOKです(ここを発見するまで時間かかりました...)
知っておいた方が良さそうな設定をいくつか紹介します
software_config.image_version: こちら を参考に仮想マシンのイメージを設定します。defaultのイメージだとPython 2.7がインストールされていますw
software_config. properties: sparkの場合、環境変数はspark-env.shという構成ファイルを経由して設定します。こちら に書いてあるのですが、プロパティ名にspark-env:のようなプレフィックスをつけるどの構成ファイル向けの設定かを指定しています
lifecycle_config.idle_delete_ttl: 一定時間クラスタがIDLE状態の場合にクラスタを削除してくれる安全設定です
initialization_actions. executable_file: ここにpip-install.shを指定して、gce_cluster_config. metadata.PIP_PACKAGESにパッケージ名とバージョンを指定することで、クラスタ内に指定したパッケージがpip installされます
クラスタ作成は非同期で実行されます。そのため、クラスタ作成が完了した時に呼び出されるcallback関数を設定しておき、callback関数が呼び出されるまで待ち合わせる必要があります
__enter__と__exit__はwith文 で扱うために定義する関数です
Dataprocはクラスタ生存期間分だけ課金されるので、クラスタの削除し忘れが一番コスト的には怖いです。なので、万が一にも削除し忘れが発生しないように、with文で勝手にクラスタが削除されるように工夫しています
__enter__はwith文の入り口で呼び出される関数で、インスタンスをそのまま返しています__exit__はwith文の出口で呼び出される関数で、正常終了時も異常終了時も呼び出されます
正常終了時も異常発生時もどちらもクラスタを削除して、削除完了を待ち合わせます
異常終了時はクラスタ削除完了後、例外が伝播されます
submit_pyspark_jobはpysparkのジョブ実行を登録するための関数です
設定はこちら を参照してください
ジョブも非同期で実行されるのですが、こちらはcallback関数を受け取ってくれないため、job.statusを監視することでジョブの完了を待ち合わせます
import traceback
import time
import random
import string
from typing import List, Dict
from google.cloud.dataproc_v1 import ClusterControllerClient, JobControllerClient
from google.cloud.dataproc_v1.gapic.transports.cluster_controller_grpc_transport import ClusterControllerGrpcTransport
from google.cloud.dataproc_v1.gapic.transports.job_controller_grpc_transport import JobControllerGrpcTransport
from google.oauth2.service_account import Credentials
from google.api_core.operation import Operation
from google.protobuf.duration_pb2 import Duration
class DataprocCluster :
project_id: str
region: str
zone: str
cluster_client: ClusterControllerClient
cluster_name: str
dataproc_credentials: Credentials
creates_cluster: bool
waiting_callback: bool
def __init__ (
self,
project_id: str ,
dataproc_credential_path: str ,
region: str = 'asia-east1' ,
zone: str = 'asia-east1-a' ,
cluster_name='cluster-' + '' .join(random.choices(string.ascii_lowercase, k=10 )),
creates_cluster: bool = True ,
master_machine_type: str = 'n1-standard-1' ,
num_master_instances: int = 1 ,
worker_machine_type: str = 'n1-standard-1' ,
num_worker_instances: int = 2 ,
idle_delete_ttl: Duration = Duration(seconds=3600 ),
pip_packages: str = '' ,
environment_variables: Dict[str , str ] = dict ()
):
self.project_id = project_id
self.region = region
self.zone = zone
self.dataproc_credentials = Credentials.from_service_account_file(dataproc_credential_path)
client_transport: ClusterControllerGrpcTransport = ClusterControllerGrpcTransport(
address='{}-dataproc.googleapis.com:443' .format(self.region),
credentials=self.dataproc_credentials
)
self.cluster_client = ClusterControllerClient(client_transport)
self.cluster_name = cluster_name
self.creates_cluster = creates_cluster
if not self.creates_cluster:
return
print (f'create_cluster {self.cluster_name} started.' )
properties: Dict[str , str ] = dict ()
properties['yarn:yarn.nodemanager.vmem-check-enabled' ] = 'false'
for item in environment_variables.items():
properties[f'spark-env:{item[0]}' ] = item[1 ]
cluster_data = {
'project_id' : self.project_id,
'cluster_name' : self.cluster_name,
'config' : {
'software_config' : {
'image_version' : '1.4-ubuntu18' ,
'properties' : properties
},
'lifecycle_config' : {
'idle_delete_ttl' : idle_delete_ttl
},
'initialization_actions' : [{
'executable_file' : 'gs://dataproc-initialization-actions/python/pip-install.sh'
}],
'gce_cluster_config' : {
'zone_uri' : f'https://www.googleapis.com/compute/v1/projects/{self.project_id}/zones/{self.zone}' ,
'metadata' : {
'PIP_PACKAGES' : pip_packages
}
},
'master_config' : {
'num_instances' : num_master_instances,
'machine_type_uri' : master_machine_type,
'disk_config' : {
'boot_disk_size_gb' : 512
}
},
'worker_config' : {
'num_instances' : num_worker_instances,
'machine_type_uri' : worker_machine_type,
'disk_config' : {
'boot_disk_size_gb' : 512
}
}
}
}
response: Operation = self.cluster_client.create_cluster(self.project_id, self.region, cluster_data)
response.add_done_callback(self.__callback)
self.waiting_callback = True
self.__wait_for_callback()
print (f'create_cluster {self.cluster_name} finished.' )
def __callback (self, operation_future):
print ('callback called.' )
print (operation_future.result())
self.waiting_callback = False
def __wait_for_callback (self):
print ('waiting for callback call...' )
while True :
if not self.waiting_callback:
break
time.sleep(1 )
def __enter__ (self):
return self
def __exit__ (self, exc_type, exc_value, tb):
if tb is not None :
print ('' .join(traceback.format_tb(tb)))
if not self.creates_cluster:
return
print (f'delete_cluster {self.cluster_name} started.' )
response: Operation = self.cluster_client.delete_cluster(self.project_id, self.region, self.cluster_name)
response.add_done_callback(self.__callback)
self.waiting_callback = True
self.__wait_for_callback()
print (f'delete_cluster {self.cluster_name} finished.' )
def submit_pyspark_job (self, main_python_file_uri: str , python_file_uris: List[str ]):
print (f'submit pyspark job started.' )
job_details = {
'placement' : {
'cluster_name' : self.cluster_name
},
'pyspark_job' : {
'main_python_file_uri' : main_python_file_uri,
'python_file_uris' : python_file_uris
}
}
job_transport: JobControllerGrpcTransport = JobControllerGrpcTransport(
address='{}-dataproc.googleapis.com:443' .format(self.region),
credentials=self.dataproc_credentials
)
dataproc_job_client = JobControllerClient(job_transport)
result = dataproc_job_client.submit_job(
project_id=self.project_id, region=self.region, job=job_details)
job_id = result.reference.job_id
print (f'job {job_id} is submitted.' )
print (f'waiting for job {job_id} to finish...' )
while True :
time.sleep(1 )
job = dataproc_job_client.get_job(self.project_id, self.region, job_id)
if job.status.State.Name(job.status.state) == 'ERROR' :
raise Exception (job.status.details)
elif job.status.State.Name(job.status.state) == 'DONE' :
print (f'job {job_id} is finished.' )
break
storage.py
GCSを操作する処理をまとめたモジュールです。
import os
from typing import Optional, List
from google.oauth2.service_account import Credentials
from google.cloud import storage
from google.cloud.storage.bucket import Bucket
from google.cloud.storage.blob import Blob
class StorageClient :
bucket_name: str
storage_client: storage.Client
bucket: Bucket
def __init__ (self, bucket_name: str , project_id: Optional[str ] = None , storage_credential_path: Optional[str ] = None ):
self.bucket_name = bucket_name
if project_id is None or storage_credential_path is None :
self.storage_client = storage.Client()
else :
storage_credentials = Credentials.from_service_account_file(storage_credential_path)
self.storage_client = storage.Client(project=project_id, credentials=storage_credentials)
self.bucket = self.storage_client.get_bucket(self.bucket_name)
def upload_to_gcs (self, file_path: str , gcs_base_path: str ) -> str :
blob: Blob = self.bucket.blob(f'{gcs_base_path}/{os.path.basename(file_path)}' )
blob.upload_from_filename(file_path)
return f'gs://{self.bucket_name}/{blob.name}'
def download_from_gcs (self, prefix: str ) -> List[Blob]:
return list (self.bucket.list_blobs(prefix=prefix))
実行結果
main.pyを実行すると、クラスタが作成され分散処理が実行されます。
python main.py
ドライバープログラムのログは以下のような感じになりました。
[nltk_data] Downloading package punkt to /tmp/nltk_data...
[nltk_data]   Unzipping tokenizers/punkt.zip.
[nltk_data] Downloading package stopwords to /tmp/nltk_data...
[nltk_data]   Unzipping corpora/stopwords.zip.
20/03/30 04:14:41 INFO org.spark_project.jetty.util.log: Logging initialized @9200ms
20/03/30 04:14:41 INFO org.spark_project.jetty.server.Server: jetty-9.3.z-SNAPSHOT, build timestamp: unknown, git hash: unknown
20/03/30 04:14:41 INFO org.spark_project.jetty.server.Server: Started @9410ms
20/03/30 04:14:41 INFO org.spark_project.jetty.server.AbstractConnector: Started ServerConnector@xxxxxxxxxx{HTTP/1.1,[http/1.1]}{0.0.0.0:xxxx}
20/03/30 04:14:41 WARN org.apache.spark.scheduler.FairSchedulableBuilder: Fair Scheduler configuration file not found so jobs will be scheduled in FIFO order. To use fair scheduling, configure pools in fairscheduler.xml or set spark.scheduler.allocation.file to a file that contains the configuration.
20/03/30 04:14:42 INFO org.apache.hadoop.yarn.client.RMProxy: Connecting to ResourceManager at test-cluster-m/xx.xx.xx.xx:xxxx
20/03/30 04:14:42 INFO org.apache.hadoop.yarn.client.AHSProxy: Connecting to Application History server at test-cluster-m/xx.xx.xx.xx:xxxx
20/03/30 04:14:46 INFO org.apache.hadoop.yarn.client.api.impl.YarnClientImpl: Submitted application application_1585541507498_0001
[[(2, 1.0)], [(0, -0.14448800681796353), (1, -0.6778027557186347), (3, -0.7205046986043693), (4, -0.02407528847231786)], [(0, -0.10353187224533954), (1, -0.7187360523274335), (3, 0.6873792958176269), (4, -0.014468662530294052)], [(0, -0.7229380237059977), (1, 0.09970102003471652), (3, 0.01737657210670717), (4, 0.6834605879097376)], [(0, -0.7190388298211174), (1, 0.13944837996685944), (3, 0.028338438513956645), (4, -0.6802457228360109)], [(0, -0.7205843071984989), (4, -0.6933673313758443)], [(1, 0.7437427088440981), (2, -0.6684659924343523)], [(1, -0.302843196389016), (2, -0.33694671350015426), (3, -0.8914891534182169)], [(0, -0.7205843071984968), (4, 0.6933673313758468)], [(1, -0.5959301816841694), (2, -0.6630385578683955), (3, 0.45304203926089587)], [(0, 0.7313550517447567), (4, 0.6819969122271922)], [(1, 0.19120874026768891), (2, 0.34759578248858897), (3, -0.9179413868223778)], [(1, -0.6530879900683576), (2, -0.6530879900683579), (3, -0.38334338973946774)], [(0, 0.5711616686116605), (1, -0.45765536984922495), (2, 0.42021204383576954), (3, 0.06379081309898492), (4, -0.5326147586543657)], [(0, 0.4567872152559851), (1, 0.5722471994880232), (2, -0.5254284798523805), (3, -0.07976332531831758), (4, -0.4259592787473683)], [(0, -0.8020751369226582), (3, 0.1701089001275885), (4, -0.5724844424330511)], [(1, 0.5061042429570382), (2, -0.8624723156489627)], [(0, -0.8020751369226586), (3, 0.17010890012758795), (4, 0.5724844424330502)], [(0, -0.24550844631891117), (1, -0.4365008983829189), (2, -0.25614150473912134), (3, -0.8267914477345281)], [(0, -0.1440659185336258), (1, 0.743858495260885), (2, 0.436500898382919), (3, -0.4851664826182654)], [(0, 0.9999999999999998)], []]
20/03/30 04:15:15 INFO org.spark_project.jetty.server.AbstractConnector: Stopped Spark@7516b90b{HTTP/1.1,[http/1.1]}{0.0.0.0:4040}
ジョブの出力が完了しました
余談ですが、nltkデータのdownloadがドライバープログラムのログに出力されていることから、ドライバープログラムでdownloadされたntlkデータがリモートサーバに共有されてリモートサーバ側でntlkの処理が実行されていることがわかります。
このdownload処理は、worker.pyのグローバルスコープに実装されているので、ドライバープログラム(master.py)でimportされた時点で実行され、そのデータはグローバルスコープの変数として保持されます。この変数をrdd.map()に渡したアプリケーションコード(lambda関数)で利用しているため、sparkがその変数をリモートサーバに共有して、リモートサーバでも利用できています。
トラブルシューティング
実装していると、色々なトラブルが起きました。解決に時間がかかったものもありますので、参考までに原因と対処方法を紹介しておきます。
Pythonのバージョンが2.7になってしまう
原因
クラスタ内のノードを構築する際の仮想VMのイメージのバージョンは、2020/3/30時点ではdefaultだと1.3-debian9 なのですが、Pythonのバージョンが2.7になっているためです
対処
Pythonのバージョンが3.6の1.4-debian9や1.4-ubuntu18 をimage_versionに指定しました。
実装サンプル
cluster_data = {
'config' : {
'software_config' : {
'image_version' : '1.4-ubuntu18' ,
},
},
}
google.api_core.exceptions.InvalidArgument: 400 Insufficient 'DISKS_TOTAL_GB' quota. Requested xxxx.x, available xxxx.x.
原因
利用可能なトータルDISKサイズを超えてしまっているためのようです。
こちら には、各ノードのDISKサイズはdefaultだと500GBと書いてあるのですが、実際に試した結果、VMのイメージによってdefault値は異なるようです。1.4-ubuntu18だと1000GBでした。
対処
合計のDISKサイズがDISKS_TOTAL_GB quotaを超えないように、disk_config.boot_disk_size_gbを設定しました。
実装サンプル
cluster_data = {
'config' : {
'master_config' : {
'disk_config' : {
'boot_disk_size_gb' : 128
}
},
'worker_config' : {
'disk_config' : {
'boot_disk_size_gb' : 128
}
},
},
}
workerノードを10台用意しているのに、1台しか使われない
原因
sparkのdocument には Normally, Spark tries to set the number of partitions automatically based on your clusterと書いてあるので、RDDはいい感じにパーティショニングされることを期待していたのですが、全てのデータが一つのパーティションに含まれてしまい、1台のworkerノードで順番に処理されていました。
対処
numSlicesパラメータで、明示的パーティションを区切るようにしました。
実装サンプル
rdd: RDD = sc.parallelize(range (len (grouped_sentences)), numSlices=40 )
org.apache.spark.scheduler.TaskSetManager: Stage 0 contains a task of very large size (xxxx KB). The maximum recommended task size is xxx KB.
分散処理しようとするRDDのサイズが大きすぎるとこのような警告が出ます。警告が出る上、一向に応答が返ってこなくなります。
対処
文書そのものはサイズが大きいので、ブロードキャスト変数 として、ノード間で共有しました。
実装サンプル
文書のindexだけをRDD化して並列タスクを起動し、並列タスクの中で、ブロードキャスト変数から対象データをindexで取り出して処理するようにしています。
sc: SparkContext = SparkContext()
rdd: RDD = sc.parallelize(chuncked_sentences_indexes)
broadcasted_chuncked_sentences: Broadcast = sc.broadcast(chuncked_sentences)
vectors: List[List[Tuple[int , Decimal]]] = list (chain.from_iterable(
rdd.map(lambda index: worker.vectorize(broadcasted_chuncked_sentences.value[index])).collect()
))
org.apache.hadoop.hdfs.DataStreamer: DataStreamer Exception java.io.IOException: Broken pipe
原因
collect()はmap処理で変換したRDD全体をmasterノードにfetchする処理ですので、大きすぎるサイズのRDDをcollect()した際に発生します。ずっと応答がなく、約1000秒経過してから本警告が出力され、最終的には異常終了しました。
対処
本文中のサンプルコードでは、コードを簡素にするためにベクトルデータをそのままcollect()していますが、実際には、collect()せず、workerノード側でベクトルをGCSに直接出力するようにしました。
workerノードのExecuterで実行されるタスク内で環境変数を参照できない
原因
spark-env.shで設定する環境変数は、ドライバプログラムからしか参照できないようです。つまりExecuterには環境変数はコピーされません。
対処
並列タスクのアプリケーションコードに含まれる変数はコピーされるため、masterノード内で取得した環境変数を変数や引数として並列タスクのアプリケーションに渡します。
実装サンプル
このケースでは、並列タスク中のvectorize()の引数に環境変数を渡しています。
sc: SparkContext = SparkContext()
rdd: RDD = sc.parallelize(chuncked_sentences)
vectors: List[List[Tuple[int , Decimal]]] = list (chain.from_iterable(
rdd.map(lambda index: worker.vectorize(chuncked_sentences, os.environ['BUCKET_NAME' ])).collect()
))
クラスタ作成中にCtrl+Cなどでプログラムを強制終了すると、意図せずクラスタが残ってしまうことがある
対処
クラスタを作成する際に、IDLE状態で一定時間経過したクラスタを削除する設定を行います。
実装サンプル
lifecycle_configのidle_delete_ttlで指定します。
from google.protobuf.duration_pb2 import Duration
cluster_data = {
'config' : {
'lifecycle_config' : {
'idle_delete_ttl' : Duration(seconds=3600 )
},
},
}
Unable to allocate xxx. MiB for an array with shape (xxxxxxxx,) and data type float64 at org.apache.spark.api.python.BasePythonRunner
原因
物理メモリが足りていない場合に発生します。
対処
RDDを出来るだけ分割して1サーバの処理件数を減らしたり、使わなくなった変数をdelで解放したりしたものの、どうしてもエラー発生を抑えられなかったので、最終的にはworkerノードのマシンタイプ を変更しメモリを増強しました。
Container killed by YARN for exceeding memory limits. x.x GB of x GB physical memory used. Consider boosting spark.yarn.executor.memoryOverhead or disabling yarn.nodemanager.vmem-check-enabled because of YARN-4714.
原因
こちら を参照すると、仮想メモリが足りない場合に発生するようです。
対処
物理メモリ利用量をモニタリングしている限り、問題なさそうに見えたので、エラーログに出ているように"disabling yarn.nodemanager.vmem-check-enabled"の対処を行いました。
実装サンプル
software_configのpropertiesでyarn-site.xmlでyarn.nodemanager.vmem-check-enabledの値がfalseになるように設定しています。
cluster_data = {
'config' : {
'software_config' : {
'properties' : {'yarn:yarn.nodemanager.vmem-check-enabled' : 'false' }
},
},
}
クラスタ内で実行されるPythonファイルにおいて、別フォルダのPythonモジュールを読み込めない
原因
今回、GCS上でも共通モジュールをmoduleフォルダに配置していたのですが、
├── master.py          # masterノードでの処理
├── worker.py          # workerノードでの分散処理
└── module
    ├── dataproc.py    # Dataprocを操作するモジュール
    └── storage.py     # ストレージを操作するモジュール
ジョブをsubmitすると、GCSからPythonのソースコードがmasterノードに配備されるのですが、この際ソースコードはGCS上の論理的なフォルダ構成を無視して一つのフォルダに全て配置されます。from module import storageのように階層構造を意識した構成だとModuleNotFoundErrorが発生してしまいます。
対処
元から同一の階層に全てのPythonソースコードを配置するのも手ですが、今回はそもそも巨大な名寄せアプリケーションがあり、その中でたくさんの共通モジュールを作成しており、その共通モジュールを分散処理でも利用したかったので、その手は取りたくありませんでした。
なので、まず階層ありimportして、もしエラーが発生したら階層無視でimportするような作りにしました。
実装サンプル
try :
from module.storage import StorageClient
from module import logger
except ModuleNotFoundError:
from storage import StorageClient
import logger
PermissionError: [Errno 13] Permission denied: '/home/nltk_data'
原因
nltk_dataをダウンロードする際のデフォルトフォルダである/homeに対して書き込み権限がないためです。
対処
書き込み可能なフォルダに対して、nltk_dataをダウンロードするように変更しました。
実装サンプル
`/tmp/nltk_data'をダウンロード先にう設定し、さらに、nltkが参照する先のパスに加えています。
import nltk
nltk_data_dir: str = '/tmp/nltk_data'
nltk.download('punkt' , download_dir=nltk_data_dir)
nltk.download('stopwords' , download_dir=nltk_data_dir)
nltk.data.path.append(nltk_data_dir)
なぜDataProc?
参考までにDataprocを採用した理由も書いておきます。
Google Cloud Dataprocは、オープンソースのデータツールを利用してバッチ処理、クエリ実行、ストリーミング、機械学習を行えるフルマネージドな Spark / Hadoop クラウドサービスです。
フルマネージドなので、Linuxの環境構築やSparkクラスタ構成用の設定など何も知らなくても分散処理を行うことができることが最大のメリットだと思います。
また、Dataprocは料金 もかなり安いです。Dataprocではクラスタ生存期間に対して課金されるのですが、仮想CPU毎に1時間あたり1セント($0.01)です。
N1標準マシンタイプ(n1-standard-1)10台 × 1週間 $0.010 × 10 × (24 × 7) = $16.8 = 1,848円
ただし、GCEの料金 が別途かかることに注意してください。
さいごに
今回、文書のベクトル化にDataprocを利用してみましたが、ある程度工夫することで、他のPythonプログラムと同様に、分散処理についてもPython起点でシームレスに実行することができました。
実行時間も1ヶ月->1週間まで短縮できましたし、学習コストも実際の料金もそれほどかからなかったので、とても満足しています。今後も活用していきたいと感じました。
弊社では、Dataprocに限らず新しい技術を取り入れることに対して個々人の裁量が大きく、組織としても後押ししてくれる文化があります。個人的にはそこがすごく気に入っていて、新しい技術を実務の中でチャレンジしていきたい人にはとても良い職場だと思います。
少しでも弊社に興味を持った方は↓↓↓のリンクから気軽にご連絡ください。


